
Hacker Noon
How to Automate Social Media Posts From Canva Designs With an API
I have spent a lot of time watching brand teams work, and what slows them down is almost never the design itself but the throughput, because that one beautiful Canva promo immediately needs a square for Instagram, a portrait for Stories, a landscape for LinkedIn, three price variants for an A/B test, a German and Portuguese version, and a fresh batch every week the campaign runs, and each of those is a person opening Canva, editing two text fields, re-exporting, downloading, and pasting the result into a scheduler. Now think about how that scales out across channels, because this is where the cost really hides. The average person now bounces between about seven social platforms a month , so the moment someone says "just post it everywhere" you are quietly multiplying every one of those manual export steps by the number of places you want to show up, and the work grows linearly with your reach instead of staying flat. This is mechanical work, which is exactly what an API is for. The problem is that Canva is a design-time tool rather than a run-time service you can call from a backend to render two hundred variants on a cron job. To automate it, you first have to move the design somewhere programmable without rebuilding it by hand. This post walks through that pipeline end to end. Image-rendering APIs like Bannerbear and Placid all do the same core job of taking a template in and returning an image, and the pattern works with any of them. I am going to use Orshot here because it imports a Canva design directly and can publish to social in the same call, which keeps the whole pipeline in one place. What automating from a Canva design actually requires If you’re a developer or a technical educator introducing automation to a team, here’s the flow you would want to automate: Parameterize the design so its text, images, and colors become variables you can set from code. Render each variation programmatically, one call per variant or a whole batch at once. Publish the finished asset to the right social accounts without reaching for another tool. Most teams do the render step well but skip the first step, often with a hacky screenshot. I will show you how to do all three the easier way. Step 1. Turn your Canva design into a parameterized template In this step, you will learn how to import your Canva design and parameterize it for API usage. In Orshot, open the templates view and hit New Template . The create dialog gives you a row of tabs that includes Library, Create with AI, Figma, Canva, Polotno, and Bulk Import. Pick the Canva tab. It asks you for exactly one thing, which is the public share URL of your Canva design. To get that link inside Canva, open Share, choose Publish a public view link, and copy what it gives you. The design has to be set to public view, otherwise the importer cannot read it. Paste the link and click Import Design . The importer fetches the design and parses it into native, editable layers rather than flattening everything into a single screenshot. In the summary, you'd see that it was able to parse five text layers, three images, and two shapes, and kept their fonts, colors, and positions. In Studio, each text and image layer is a parameter you can set from the API. It's important to consider the limitations of such an import: Canva animations do not carry over Some Canva Pro elements may not import Custom brand fonts need to be uploaded again in Orshot Static social graphics (promos, quote cards, product drops, event banners) usually import cleanly and even motion-heavy designs work well as editable starting layouts (not necessarily pixel-perfect copies). Step 2. Render variations with the API Open the template's Automate panel. It lays out the template ID, every detected parameter, and the integration targets (such as REST API, MCP, CLI, and Make). Open the REST API tab. It shows a ready-to-run request with your template ID and parameters already filled in. One of the variants is a POST request. The keys in modifications match your Canva layers, like text_1_1 , text_1_2 , and img_1_1 . const res = await fetch("https://api.orshot.com/v1/studio/render", { method: "POST", headers: { "Content-Type": "application/json", Authorization: "Bearer <ORSHOT_API_KEY>", }, body: JSON.stringify({ templateId: 12668, modifications: { text_1_1: "Cyber Monday, 60% Off", text_1_2: "Up to 60% off across the store", img_1_1: "https://acme.com/products/winter-drop.jpg", }, response: { type: "url", format: "png" }, }), }); const { data } = await res.json(); // data.content -> hosted URL of the rendered image Once you have that one call working, every variant is just a loop around it. You pull rows from a database, a CSV, or a spreadsheet and map each row onto the modifications object. If you need every platform size at once, multi-page templates accept keys like page1@text_1_1 and page2@text_1_1 , so a single call can render an entire carousel. Step 3. Publish to social in the same call You do not need a separate scheduling tool as you can connect all your accounts once on the Social Accounts page (X, Instagram, TikTok, and others) and then post from the same render call. Each connected account shows an Account ID on the page. You can add a publish object to the same render request you already wrote so that the rendered image goes out as a post directly (it does both the render and publish in the same request). await fetch("https://api.orshot.com/v1/studio/render", { method: "POST", headers: { "Content-Type": "application/json", Authorization: "Bearer <ORSHOT_API_KEY>", }, body: JSON.stringify({ templateId: 12668, modifications: { text_1_1: "Cyber Monday, 60% Off", text_1_2: "Up to 60% off across the store", img_1_1: "https://acme.com/products/winter-drop.jpg", }, response: { type: "url", format: "png" }, publish: { accounts: [1, 2], // your connected account IDs content: "Our Cyber Monday sale is live. Up to 60% off across the store.", }, }), }); The response returns the rendered asset and a publish status for each account. { "data": { "content": "https://storage.orshot.com/.../render.png", "format": "png" }, "publish": [ { "platform": "twitter", "username": "acmehq", "status": "published" }, { "platform": "instagram", "username": "acmeinsta", "status": "published" } ] } If you would rather queue a post than fire it immediately, you can pass schedule.scheduledFor as an ISO 8601 timestamp along with a timezone , or set isDraft: true to stage the post for review. Publishing never blocks the render either, so if one platform fails the others still go out and you get the specific error back for the account that failed. The no-code path through Make and n8n If you would rather skip the API, use n8n or Make instead. Both integrations can be accessed on the same template in the Automate panel. In n8n, add an Orshot node, sign in with your API key, choose Generate Image from Studio Template , pick your template, and map your data to the modifications. For more on workflow automation, see an open workflow tool to power the age of agentic AI . In Make, add the Orshot module to your scenario and set it up the same way. In a common workflow, a new row in Google Sheets or Airtable triggers Orshot to render the graphic and post it to your social accounts on a schedule. That covers render and publish in one pass. To push one graphic across multiple platforms with n8n, see automating content cross-posting in n8n . When this is genuinely overkill I want to be straight with you about the threshold here, because not every team needs this. If you publish twice a week and never localize your content, a plain scheduler and Canva by hand is perfectly fine, and this pipeline is just overhead you do not need to carry. It starts to make sense when you need dozens of variants per campaign, different copy per product or market, or the same design in five aspect ratios. Manual export do not scale at that point and a render-and-publish API would handle it in one request. Wrapping up Automating your workflow is worth it as soon as manual export and posting start taking noticeable time, whether through an API or a no-code tool like Make or n8n. Just turn Canva template into an API , render as many customized variants as you need, and publish straight to your social channels. This does not change or mess with your original design in Canva. Once the design is set, Orshot takes care of creating all the versions and posting them, so your team can keep working on new ideas while the tool sends out your posts. \n \
View original source — Hacker Noon ↗
Related stories
The Punch
TechnologyJul 2, 2026 · 1 min
Court adjourns Emeka Ike’s N10bn suit against INEC, Wike’s aide
The Punch
TechRadar
TechnologyJul 2, 2026 · 1 min
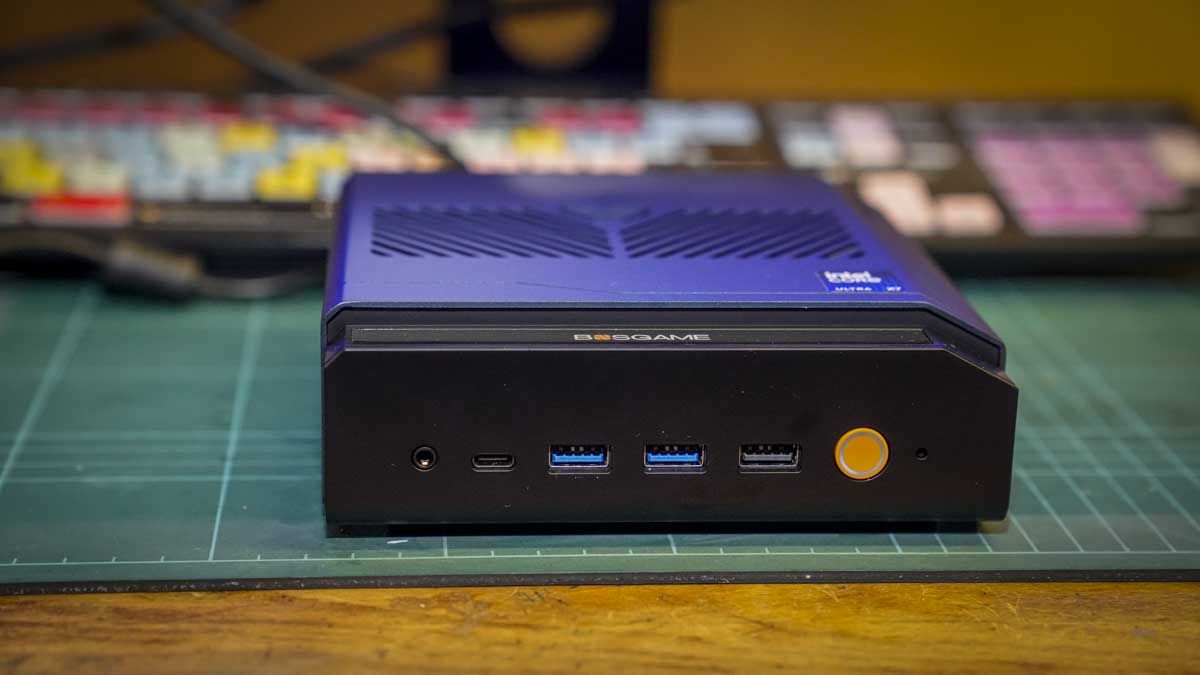
Bosgame VTI-490 review: This mini PC packs in more power than expected and handled network editing like a workstation
TechRadar

Euronews
TechnologyJul 2, 2026 · 1 min
OpenAI offers the US government a 5% ownership stake
Euronews

TechRadar
TechnologyJul 2, 2026 · 1 min
Amazon reveals it used more energy than New Zealand in 2025 as its carbon footprint rises 16%
TechRadar